
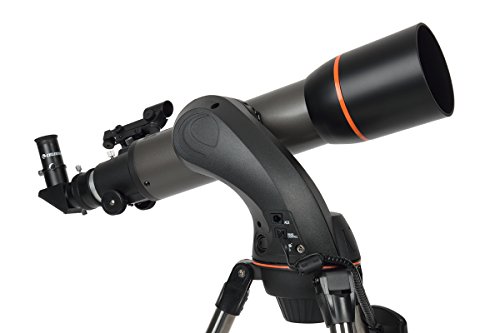
- High quality 102 mm short tube style refractor
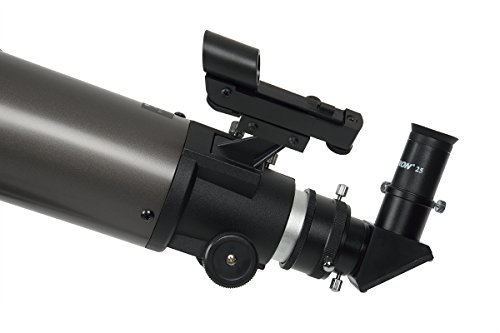
- StarPointer finderscope to help with alignment and accurately locating objects
- Good for terrestrial and celestial observing
- SkyAlign allows you to align on any three bright celestial objects, making for a fast and easy alignment process
- Flash upgradeable hand control software and motor control units for downloading product updates over the Internet
-
Information
-
Twitter
-
Pinterest
-
Youtube
-
Facebook
Ella Belle
Great for telescope beginners
Never owned a high powered telescope before, figured this model was a great starting point or a permanent point. We love it! The SkyAlign feature works really easily. The first time we set it up I programmed the location and time, BAM right out of the gate it auto finds everything in the sky! The second time I had some difficulty having the SkyAlign to work months later... think it was the daylight saving time option I had wrong because it worked the second time I tried. With just this base telescope you can see the moons around Jupiter and the rings around Saturn. We are gonig to buy a lens set with Barlow to get some more magnification.
Brian Mackenzie
This is an awesome beginner Telescope!
I have use this to view the Sun (with a Bader solar filter), Moon, Jupiter, Saturn, Albireo, Andromeda, and Pleiades. You get stunning views of the moon and sunspots are very distinguishable with this scope. Saturn is pretty small, but the rings are distinct and some moons can be spotted around Saturn. I was able to faintly see the bands of Jupiter and the Galilean moons are pretty bright. You would need a bigger telescope to get more detail from the planetary objects, but the views you get in this scope still makes anyone who looks pretty amazed at what they are viewing. I love the fact this has a computerized tripod mount. This takes the frustrations away of trying to keep an object in view as well as trying to locate something in the vast night sky. The setup take some practice, but it does get easier after a few attempts. My neighbor has an 8” Nexstar SL with the StarSense Automatic Alignment Accessory and I still usually beat him to having an aligned telescope by doing it with the built in SkyAlign method. The tracking is good as long as you have fresh batteries, but I highly recommend using an external power source because the batteries get drained in a few hours. I also recommend using an app to help locate objects. I am planning on getting the WiFi modules so I can use my phone to control the telescope. The included hand controller does take some time to learn, and the menu navigation can be clunky. You can use the free Celestron SkyPortal app for control your scope if you have the WiFi module. Once you have the telescope aligned it is pretty accurate on its tracking. One night I centered Saturn and went inside to watch TV for 2 hours and I was amazed that Saturn was still in the eyepiece when I came back out! You will want to make sure you have the tripod level, fresh batteries, the correct latitude/longitude, time, and date to help ensure your tracking is accurate. This Telescope has made me excited to get out on clear nights and discover the night sky and has also helped get me into trying astrophotography. I was able to use my Olympus E-PL5 the other night piggy backed on the telescope which helped me get a decent shot of Andromeda. I took an hour of exposures it was nice to have the tracking of the telescope available so Andromeda stayed centered in my camera. I also bought a T-Adapter so I could photograph objects using the telescope as a prime lens. My sun and moon shots came out very clear using this method. The sun and moon shots attached are not cropped, and you can see almost the entire frame is consumed by the sun or moon which give a great amount of detail. I highly recommend this telescope! If you can afford a larger telescope, then get the biggest one you can afford, but even though this is only a 3 1/2" scope it can give you some great views of the night sky.
Mutcasa Montealegre Resh
Good for beginners
This is my first reflector telescope, great for planet viewing but not that good for deep space objects. If you want to do astrophotography, this would be a good start. I’m new to astrophotography, using my Sony A7 with several accessories, I can easily take pictures with this telescope. But to be honest, there is a serious problem, 130 slt seems have a Focuser that can not get enough “in-focus” distance for DSLR shooting with prime focus(someone said Panasonic 3/4 sensor Camera can do it), I have to use eyepiece project which caused bad image quality and hard to focus even use a motor driven Focuser. I have serious coma problem when shooting, I don’t know what caused it or it’s just common for reflectors like this. Trying to find out.
Enelrahc Nahilaam
Great scope once you get the setup down
My wife bought this scope for me for Christmas. I had no experience with astronomy prior to that. It's a little finicky to set up but once you do it correctly, it'll work well. The image may not be exactly in the center but it should be close. The eyepieces that come with it are just okay. They're a step below kelner eyepieces (which is below Plossls). For eyepieces, use a low power eyepiece (25mm) to scan for objects. With eyepieces, the lower the number the higher the magnification. If you buy eyepieces, stick to good quality eyepieces in the 5mm to 35mm range. More magnification (<5mm) doesn't really help as the scope is limited by the atmosphere. Lower magnification eyepiece (>35mm) will result in an exit pupil that is too large (makes it difficult to see without a moving black blob appearing in the eyepiece). Celestron X-Cel eyepieces would work well for this scope and aren't too expensive. I like the Baader Hyperion as well. It gives a wide angle view and a large eyeglass with good eye relief to look through (great for eyeglass wearers). A x2 Barlow lens is a good option to pick up as well. Combined with your eyepieces, it doubles your available magnifications (9mm becomes a 4.5mm, 25mm becomes a 12.5mm). I have the Orion shorty x2 barlow. Don't bother with the eyepiece kits. The optics are too close together in strength so you'll probably only use 3 of the 5. The color filters are pretty useless except for a moon filter. All you really need are 3 eyepieces a low power (no greater than 35mm), a medium power (14-18mm) and a high power (no less than 5mm). You'll need a collimator. With Newtonians, you'll need to align the mirrors. It's best if you check it each night before you use it. Moving the telescope can knock it out of wack. A collimator helps you line everything back up. I have the Orion laser collimator. Here are some setup tips for setting up the scope for Goto use: 1. If you picked a city instead of entering a latitude longitude, and you don't actually live in the middle of the city (you just picked the closest one), do a factory reset of the computer and choose latitude-longitude instead. It's much more accurate. You can find the latitude longitude with a smart-phone app (e.g. Compass for Android) or by googling your address. You'll need the lat long in degrees, minutes, seconds (not the digital version like -117.0101). It should look like W 117 15' 12' Sometimes a city selection is too broad. I am about 20-30 miles outside the city I chose and it makes a big difference when the scope is skewing. 2. Make sure you're using the correct time/date settings including daylight savings time vs standard time. Use your cellphone time. 3. Instead of using 3-star align, use Auto-Two-Star align. It'll require you to know the names of the stars but it's much better. I use Google Skymap to find one of the stars in the list if I don't know the name or the ones I do know are obscured. If you use the 3-star align, chose bright stars that are on opposite sides of the sky and not in a line (a triangle pattern is preferred). For example, if you just used the stars in Orion, that's probably too small of an area of the sky. Choose one star in Orion (e.g. Betelgeuse), one in Gemini (e.g. Castor) and one in Cassiopeia. 4. When centering a star during alignment, defocus the star so it looks like a ball rather than a point of light. It'll be much easier to get in in the center. 5. When centering on the final star try to move the scope in the same direction as it was moving when it skewed to the star you chose. So for example, if it was moving down and to the left when it stopped, position the scope so that when you get it in the center of the view that you are moving it down and to the left when you stop. UPDATE 5/19/2016: I recently purchased a ZWO ASI185MC camera that I'm using with the 130SLT. The camera will easily come to focus when used in the 2" adapter. It will come to focus in the 1.25" adapter as well but it's a little closer to max in-focus. I'm getting pretty good images with it doing short exposure (<15seconds) and stacking. You'll want to use a Bahtinov Mask to focus. I purchased an Orion Accufocus which greatly helps with focusing the image without everything shaking. Check my reviews for the correct items. I also have it working with a computer (computer drives the scope). You need to install ASCOM drivers (6.2) and ASCOM drivers for the Celestron product line. Just search for "ASCOM drivers" on google. It's not necessary but it's nice for an all-in-one software package (Astrolive USB). I added some pictures I took of M51, M57, Jupiter and the moon. These were taken from my front yard about 5 miles from the city. The deep space objects won't appear that clear when viewing through the eyepiece (cameras pick up more light than our night vision does). Update 6/28/2016: One thing to really improve your goto results is to use "Precise Goto". It's undocumented in the manual. It's accessed differently than a regular goto. Press the "Menu" button. Then use the up/down arrows (6 &9 key) to find "Precise Goto". Then select "Database". Finally, choose from the object list type using the up/down arrows (e.g. Messier, NGC, Named Objects). So for instance, if I choose "Messier" and then enter the number for the Messier Object (1-110). It will calculate and give you a list of 5 bright stars with #1 being closest to the object. Select 1. The scope will slew to where it thinks it is. Center the bright star with the red dot finder and look through your eyepiece to see if it's centered there as well. Once it's centered in the eyepiece, hit. The scope will slew to the object and there's a good chance it will be centered in your eyepiece. I use this feature with my camera and it almost always gets it close to the field of view. You should easily find the object in the field of view of a 25mm eyepiece (though it may be faint and fuzzy).
Nicole Farquhar
Great portable telescope. Sharp and clear views.
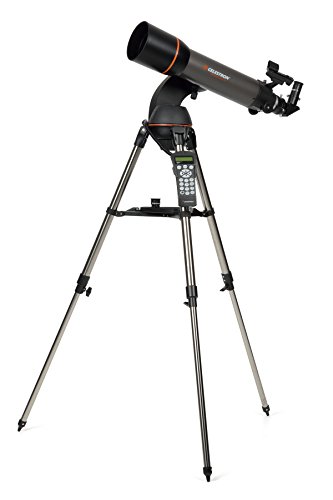
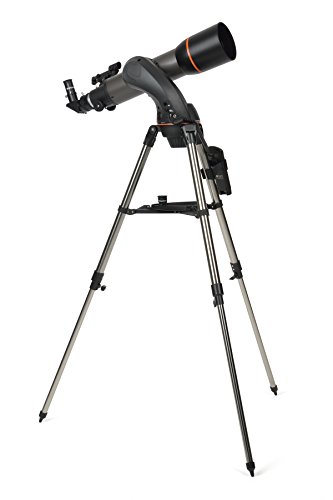
We bought this telescope to replace our 114mm newtonian. We also have an 10" dobsonian, but we wanted something portable to take on trips, and not breaking the bank. (Going to the beach with a dobsonian is an adventure by itself, including waiting for thermal equilibrium, recollimating, etc). This telescope is portable and solidly built. The tripod could benefit from a little more rigidity, such as changing the pop-rivets on the legs with actual screws. The Mak optics on the 127slt are very clear and sharp compared to both our other telescopes. The included eyepieces are lower tier quality, but the optical tube assembly is already worth the money. We were surprised to be able to clearly see mars' poles (wow!) and distinguish a second ring on saturn using an aftermarket 9mm plossl, in our backyard, in spite of massive light pollution in our area. The motor drive is rather accurate and silent, with anti-backlash, metal gears. The drive arm is metal and feels rather solid, specially compared to the meade autostar - style construction. The nexstar+ control also allows for solar system alignment, which makes it very easy and allows for alignment when you have a constrained horizon. In a summary. Pros: -Great OTA optical quality -Clear and sharp views -Solidly built (except tripod) -Silent drive Cons: -Low quality "beginner" eyepieces -Tripod could be more rigid and better built. Overall, great deal for the money, even if you accept in advance that you'll have to invest in a couple of good quality eyepieces.
Ladyc Evabless Hayles
Great optics. Here's what to do if you get the "BOOT LOADER Invalid Pkg: 0080" error.
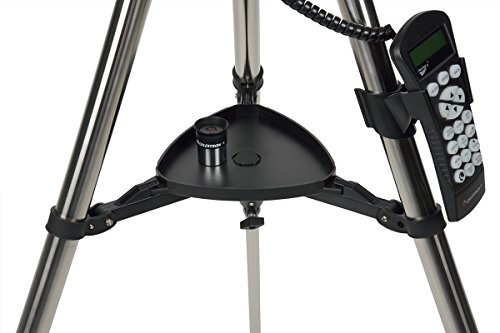
OK, here is the Bible according to Celestron SLT scopes. When the scope is working, it's fantastic (see below if you have a non-working scope with a boot loader failure). The Newtonian design is comfortable to look through - the eyepiece is at the front of the scope, and it is positioned around eye-level when standing. Newtonian optics are also simple, which keeps the cost down (and minimizes light lost to lens absorption). The optic properties of this scope are outstanding. The 650mm focal length and 150mm (about 5-1/8") aperture are great specs, especially when paired with the highly-recommended Celestron accessory kit (Celestron Model 94303, available on Amazon). The scope comes with a 9mm and 25mm eyepiece, for magnifications of 72 and 26 power (magnification is focal length divided by eyepiece length, so magnification increases as focal length increases, and decreases as eyepiece length increases). The big 130mm aperture of this scope gives the scope a maximum useful magnification of about 307 power, using the rule of thumb that you can magnify 60 times for each inch of aperture. At a focal ratio of f5, this is a fairly "fast" scope, meaning it lets in a lot of light for it's focal length. The f-number is the focal length divided by the aperture size, and the lower the f-number, the faster the scope. Faster is (generally) better. F-numbers will be familiar to photographers, and telescopic "lenses" operate on the exact same concept as fast photographic lenses. In photography, a lens is "fast" because it allows a shorter shutter speed (because it lets in more light), meaning you can capture faster motion that would be blurry with a longer exposure (as would be required by a "slower" lens). The auto-orientation works like magic, but it's better to give it very precise time and location. Use a GPS for location; don't just tell it what city you are in (you can choose your location input method). For some reason, the controller can remember your last location and the time zone of your previous observation, but the controller does not keep time when it is switched off, so you must enter the (exact) time again whenever you switch the power off and back on (C'mon, Celestron - seriously?) You can orient the scope by pointing the scope at ANY three bright objects (you do not need to know what they are) or two objects if you know what they are (but this is said to be less precise). The scope must be level (it has a built-in level bubble). Although this scope is not really classified as a "beginner's scope," it is great for beginners - you don't need to know anything to begin viewing amazing things, and a beginner will not "outgrow" this scope anytime soon. The only comparable computerized Newtonian scope that I could find in this price range is the Orion StarBlast 6i IntelliScope, but it is available only with a table-top mount (???). If that Orion scope (750mm focal length, 6-inch aperture) was available with a sturdy tripod mount in this price range then I would be writing this review for that scope, because I would have bought that scope instead, without a doubt. Orion lost my business because they expected me to have a study TABLE available at each observation site. The optional Celestron accessory kit includes (among other things) 6mm, 8mm, 13mm, 17mm, and 32mm eyepieces and a Barlow 2X adapter. With a 6mm eyepiece and a Barlow 2X adapter (which effectively doubles the magnification of the eyepiece, making it a 3mm focal length), the scope can achieve a magnification of 216 power (pretty respectable). You could purchase shorter eyepieces or a 3X Barlow to push the magnification near the 307 power limit, but I don't think you will find yourself wanting to do so - you will be amazed at what you can clearly see (the bands of Jupiter and its Galelian moons, the rings of Saturn, etc). Note that the 307-power limit cannot be exceeded with eyepieces or Barlow lenses - the image will be pretty much worthless if you try to exceed this limit, which is a function of how much light the scope can gather (which is determined by the aperture size). As you approach this limit, the image quality decreases, so you will probably find images much more satisfying at low-to-mid-200 power than you would at theoretical maximum 300+ power. The gray moon filter in the accessory kit is especially useful for bright objects (such as the moon, of course, but also Venus and Jupiter). The longer eyepieces are needed for viewing large objects such as various asterisms, galaxies, and nebula. Some of these objects span 2 or 3 degrees of sky (or more) - which is really big (the sun and moon are 0.5 degrees.) Some objects can only be fully viewed at very low magnification (such as afforded by binoculars), so don't make the mistake of assuming that high magnification is always better. If you attend a star party, expect to find binoculars (usually mounted on a tripod) in use. The Pleiades star cluster, for example, is best observed at lower magnification. The eyepieces that come with the scope (and the accessory kit) are 1.25" diameter, but the scope can also accept large, very nice (and expensive) 2" eyepieces - just remove the 1.25" adapter which comes with the scope. The tripod mount is good, but will wiggle a bit in the breeze, especially at higher magnifications. It helps to add some weight - the tripod has a small shelf which lends itself to this purpose. A couple bags of rice or beans will do, but I bought a 20-lb theatrical-grade sandbag (double zippers keep sand out of my optics, and sand doesn't attract bugs or rodents). Put that weight on your tripod and don't touch the scope while viewing (take your hand OFF of the focus knob) and you should have a steady view, even in breezy conditions. Stiff winds may require additional measures, such as springs attached to the legs and anchored to stakes in the ground. I was told by someone at a Star Party that this mount is not well suited for long-exposure deep-field photography. As it tracks objects across the sky, the mount makes slow adjustments, but it does not adjust azimuth (side-to-side) and altitude (up-and-down) at the same time, but in succession, in a stair-step pattern. The eye won't notice, but a long-exposure photo will see blurring. Alas. But I have not verified this info. In any event, it should work fine for short-exposure shots, like the moon (you will need a camera adapter, of course). The motorized mount goes through batteries pretty fast, especially if it is tracking something all the time. The default power source of eight (standard alkaline) AA batteries will probably last a night, but I would not push it to two nights if I had been tracking the whole night before. You can hook it up to a car battery and it will run forever. I use a wheelchair gel battery - they are smaller and lighter than car batteries, and will take the deep-cycle use (charge and deplete, charge and deplete). Buy a trickle charger and use it when the battery is not being used, to keep the battery fresh and extend its life. Or you can get the Celestron Power Tank. You can use an AC adapter if you have access to AC - any adapter that puts out 12 volts DC at 2.5 amps or more with a 2.5mm barrel plug (negative on outside, which is standard) will work just fine (you can have all the extra amps you want - it won't hurt anything). There are scads of suitable adapters on Amazon that are a whole lot cheaper than the one Celestron sells. This is a Newtonian scope, and Netownians are subject to collimation errors, meaning that the two mirrors are not precisely aligned. I recommend the Celestron Collimation Eyepiece (Celestron Model 94182, available on Amazon). This will allow you to quickly and easily (and accurately) calibrate your scope for an absolutely perfect image. Some people do this each time they transport their scope, because any sort of vibration can cause the mirrors to drift (though it seems to be a rather minor problem for this scope, in my experience). The instructions that come with the eyepiece are excellent. Get a red flashlight. Celestron makes one that has a dimmer. Red won't mess up your night vision nearly as badly as other wavelengths. I rate this scope at five stars, despite the BOOT LOADER problem (solution below). ========= BOOT LOADER PROBLEM ==================================================== Within two days of getting this scope, it failed to "boot" (the mount is computerized, and it needs to successfully "boot up," just like any computer. If it cannot boot, it is useless). When the hand controller was turned on, it said, "reading packages" and then stopped with an error message, "BOOT LOADER Invalid Pkg: 0080." This renders the scope dead - it cannot be moved, even with manual arrow buttons. Fixing the problem is a bit tricky. You need to flash the firmware in your hand controller (which has somehow become corrupted), but it's not as simple (or as well-documented) as it should be. First, you need to buy a serial cable to connect your computer to the controller. It's 9-pin RS-232 (female) on one end and a modular connector on the other end (it looks like a telephone plug). The Celestron model number for this cable is 93920, and you can buy it on Amazon. If you have a reasonably modern computer then you probably don't have a serial port. If you have a 9-pin MALE D-connector then you have a serial port (though it may be disabled in your system BIOS settings). Otherwise you need to buy serial capability - I recommend a USB to Serial converter (also available on Amazon from many suppliers). Connect the computer to the controller. Make sure you are plugging the serial cable into the base of the handheld controller, and not into the body of the motorized mount. Both the controller and the mount have modular serial connections (and both can be flashed), but you are flashing the handheld controller, not the mount. You need to download and install the Celestron Firmware Manager (CFM) from Celestron's website (it's in Support/Downloads/Software, near the bottom of the list). It's a Java application, so it should work on any computer platform. But it will be downloaded as a zipfile - you must extract the contents and then run CFM.jar (on Windows, just double-click it). You can't run it within the zipfile - it must be extracted. Make sure your scope is connected first. THIS IS IMPORTANT: There are two types of Celestron motorized controllers. There's the Alt/Az (which is used by this SLT mount, as well as LCM, SE 4/5/6/8, and CPC) and the Equatorial mount (used by CGE, Advanced, and CGE*). In the CFM menu (along the top of the CFM window), select "Hand Control" and make sure the proper type of control is selected for your model of scope (this CST scope is Alt/Az). THIS IS THE REALLY REALLY IMPORTANT PART - Under the mount type selection you will see three radio buttons. The first one is selected by default, and it tells CFM to automatically detect the mount type. This is NOT GOOD. CFM thought I had an Equatorial mount. Even if I select Alt/Az, my selection will be overridden by the "Auto Detect" option. Select the Second option, which says "Always do what I selected this time" and CFM will then respect your selection. Now flash the controller in the CFM, and you should be good to go. And if you go to a remote site or star party, it's a good idea to bring a laptop with CFM (and your cables), just in case you need to do this again. I was 160 miles from home (beneath a rare Class-1 darksky!!!) when I had this problem. Fortunately it was only an hour before sunrise, so I didn't miss too much.
Carmen Bxc Loyd
Nexstar 127SLT Mak is an affordable great telescope system, with proper handling
This review is specifically for the Celestron NexStar 127SLT Maksutov Computerized Telescope. There are several reasons I went with the Maksutov design, rather than the refractor or Newtonian SLT variations. The Mak gives a better image across the field of view, without the coma of a Newtonian. The folded optical path results in a long focal length for the instrument, which is ideal for Sun, Moon, and planetary viewing. However it's not as long as a refractor. The Mak can still be used for observing deeep sky objects, such as the Andromeda Galazy (M31) and Hercules Cluster (M13). Just don't expect the views of a Dobsonian 'light bucket'. It's not designed for that. The compact tube size makes it much easier to handle and transport than longer telescopes. Being a closed tube design also means it more easily keeps dust and other debris out of telescope tube. As long as one uses the tube cover on the front, and eyepiece holder plug in the back when not in use, the telescope optics will require cleaning much less often than a typical Newtonian system. The closed tube also means no thermal tube currents to distort the image. The 127 millimeter diameter aperature equates to about 5 inches in size. While this is considered small in today's era of large Dobsonian monsters, the telescope system fits in my car, and is light enough that I can take it outside easily. I get more use out of this scope than my older larger Newtonian, mainly because this instrument is just so much easier to handle. The aperature size is quite sufficient to get good views of solar system objects. It's a bit tricky to focus, as the image will easily show any motion from the focuser knob, but this is mainly a mount limitation. Once focus is acheived though, and the scope settles down, the views are great. I've used the 127 SLT with a Celestron NexImage 5 camera, and FireCapture camera software, to get great images of Jupiter's moon eclipsing the disk, Saturn's ring system, lunar craters, and solar sunspot groups (with an appropriate glass solar filter mounted on the front). Using the camera is ideal with this telescope, as it makes it a 'hands-off' system. The other great feature is the fully computerized "Goto" capability of this telescope. Once the computer system is initialized, it is able to point the telescope to any object in the sky. (Yes, one can even enter arbitrary Right Ascension/Declination coordinates to point the telescope at.) The SLT came with the NexStar+ Hand Controller, which contains the object databases, and interfaces with the user via a red backlit LCD and a red lit keypad. The hand controller I got was not the absolute latest hardware variation, which has a USB port on it, so as to allow updating the firmware in the system via a PC. Instead, I received a slightly older version (2014) that still had the RJ45 phone jack interface providing an RS232 serial connection. (Older stock in the warehouse still?) This required a USB-to-RS232 converter to connect to my laptop to update the internal flash. While the internal motor controller was at the latest firmware revision, the hand controller firmware did need updating. The Celestron Firmware Manager, available onine at their web site, did the upgrade flawlessly. The one armed fork system that connects the tripod mount to the telescope tube contains the motor control system for the alititude and azmimuth DC motors, as well as monitors their optical encoders to keep track of position. This motor controller communicates to the hand controller via a coiled cable. There is a plastic holder on one of the tripod legs made for holding the hand controller when it is not needed. The weakest link in this system has to be the 'wobbliness' of the mount. With the legs fully extended, and the tripod standing on a cement patio, every gust of wind and and hand touch is transferred to the image view. It makes it quite difficult to focus well. However a few simple tricks can be used to lessen the effect. First, don't extend the tripod legs fully. The shorter the tripod legs, the shorter the time it takes to dampen out vibrations, and the sturdier the mount becomes. Second, adding a weight to the tripod helps provide more mass, and lowers the natural vibration frequency. I've seen a picture of one user placing a small sandbag on the central tripod tray to add stability. Third, place the tripod on dirt or sand. A cement patio is not the best foundation for the tripod legs. I have gotten much less image movement by pushing the tripod legs into the dirt in the lawn. Of course, Celestron does sell vibration dampening pads to help with this issue, but they are quite pricey according to my wallet. Now if you want to get a beefier mount, go ahead and spend another grand. Celestron has bigger mounts that are better. You get what you pay for. Just be prepared to lift that heavier mount. I'll stick with this lighter variation, and save my back. I can work around its limitations. Oh, and the eyepieces that come with the telescope are probably not the ones you will want for regular use. I already have a nice set of Plossl's that I obtained years ago. I recommend doing your homework and get the eyepieces separately. My lowest power eyepiece is a 40 mm, and I like the views it gives me in the 127 Mak. One bit of information you will also find useful relates to initializing the NexStar control system. The designers did what they could to make setup as easy as possible, within the budget they had. (I've also bought the SkySync GPS accessory to help make setup easier. However their StarSense AutoAlign product is the ultimate alignment tool, and costs nearly as much as the telesope itself!) Anyway, the more care you take in initialization, the more accurate the NexStar will be in finding objects. I know this, not just from using the NexStar+ system, but from building my own telescope controllers over the years from the wire-wrapped IC sockets on up, and testing them under the night sky. Small errors in alighment will add up. So, if you want the most accurate pointing, follow these tips that are NOT in the manual: 1. Level the tripod as accurately as possible. You must do this FIRST. Every alighment option, with possibly the exception of the two-star alignments, requires a level tripod to work correctly. That's why the tripod includes its own little level, and the instructions do mention that you need to level the mount. I don't trust that little built in thing though. I use a six inch level that I place on top of the tripod, before I put the one-armed fork there. My level is placed in line with each leg in turn, and that leg adjusted until level, before moving onto the next leg. If you have some OCD like me, go around and do it again, just to be sure. Once the tripod is level, then the rest of the mount and telescope can be put together. 2. Enter in Latitude, Longitude, Date, and Time, as accurately as possible. If you have a smart phone, get a GPS app and use it. I eventually got the Celestron SkySync accessory to do this part for me. (However, you still need to double check and make sure the Time Zone and Daylight Savings settings are correct with the SkySync. The instructons don't tell you that.) 3. Use a lighted Reticle Eyepiece to center your alignment stars/planets. Don't use the Sun or Moon if you have an option, as it's very difficult to know where the exact center of those objects are in the eyepiece. A double crosshairs reticle eyepiece lit with a variably dimmed LED works great for this. 4. Keep your chosen alignment objects far apart, and at least 20 degrees above the horizon. I don't know how well the NexStar+ handles refraction corrections, but to do it right requires both temperature and pressure/elevation data. Nexstar doesn't ask for these values, and I doubt the system includes the sensors to measure the quantities directly. One final recomendation: Get an alternate power source to suppliment the eight AA batteries that need to be placed in the half fork arm mount. You still need the AA batteries, as I discovered when I attempted to get by with just a PowerTank attached. Any glitch in the power cord connection to the mount will reset the Nexstar controller, and you will find yourself staring at the intialization prompt again. So, keep the AA batteries. Just suppliment them with either an AC adapter or PowerTank gel cell battery. Otherwise the AA batteries used alone will go dead within that observing session. (I've heard they will drain in as little as 30 minutes. I didn't push it to prove that.) I recommend the PowerTank battery accessory, since you can't always guarantee that an AC power source will be reachable from where you place the telescope. For me, I'm always tripping over cords in the dark. So any long power cord to an outlet that I can get rid of, I will. I place my PowerTank directly below the tripod tray on the SLT tripod mount. That keeps the power cable to the mount away from my toes. There are cheaper telescopes out there, but for ease of use, I just can't think of a better alternative than this 127 SLT NexStar+ system. At least I'm out with it regularly, and have been for over six months now. My old Newtonian never saw this much usage.
Vickie Osborne
A mid-grade amature telescope that doesn't compromise on quality
I totally love this telescope. It has a lot of features. I got it for the 2017 Eclipse and it really outdid itself. It has several ways of tracking solar and celestial objects. It has a bit of a learning curve, but that just makes it much more educational. It comes with a semi-adequate manual. However you will learn the most by participating in conversations on the Celestron forums. NOTE: I got a very specialized filter in order to use it to look at the Sun. It does NOT come with this. Don't melt your eyeballs! Google Cloudy Skies Astronomy for a useful website for owners of Celestron telescopes.
John P Irwin
Impressive scope with a couple caveats
This is my first telescope as an adult, after having a cheaper Newtonian reflector as a kid. I never was able to really get that telescope working like I wanted, and eventually it ended up in a storage box and sold. I've been wanting to get another telescope for quite some time, and the choices were daunting. Do I buy a cost effective for aperture Dobsonian? Do I go whole hog and buy an 8" CST? What about a refactor so I don't have to worry so much about collimation? Eventually I settled on the 127SLT Maksutov-Cassegrain. It was small enough that I could transport it to and from the local astronomy club, which is a big plug for a beginner. An 8" Dob is great if your backyard is dark, not so much if you need to travel for some darker skies.The GoTo functionality is also a plus in my book, as my wife has never used a telescope, and showing her how to check out Jupiter in just a couple minutes was pretty incredible. I knew that buying this there would be some opportunity areas, and there are a couple. First, the tripod is described as wobbly, and it is. I've found much less vibrations in the grass/dirt than a hard surface. Second, I've put an 8lb. weight on the accessory table which certainly helped to dampen the vibrations. I've read other solutions to super glue joints, epoxy stuff etc. After tightening the bolts on here, I would say the vibrations are only a slight annoyance, and as long you don't manhandle the focuser or smack the eyepiece when you're viewing, they calm down quickly. 2nd is the alignment process. I read people having tons of issues with this. If I try to align using my starting point as a city, it fails. Almost every time. Whenever I punch in my GPS coordinates (compass app on iPhone by default) it aligns immediately on SkyAlign. To me, this seems a nonissue. Overall, very happy with my purchase. You'll need to add a few things to this telescope to really make it complete, but you aren't hamstrung up front by any means. 1. AC Adapter or Celestron Power Tank. This thing will eat your 8 AA batteries in no time, buy the AC adapter, or better yet the Power Tank, which is a pretty impressive piece of kit. 2. Dew shield - you will want to buy one, or craft one. Foam rubber sheets from your local hobby store work well. 3. Additional eye pieces. 4. If you're transporting it, some sort of case. HomeDepot sells an 18" Husky tool bag with a strap that works PERFECTLY. Using the two pieces of foam from the box, it fits snugly in there and doesn't slide around.
Alicia Laporta
Canon 700d
Nice telescope with 1500 focal length , this is Tank! , I took a pictures from sky of kuwait