
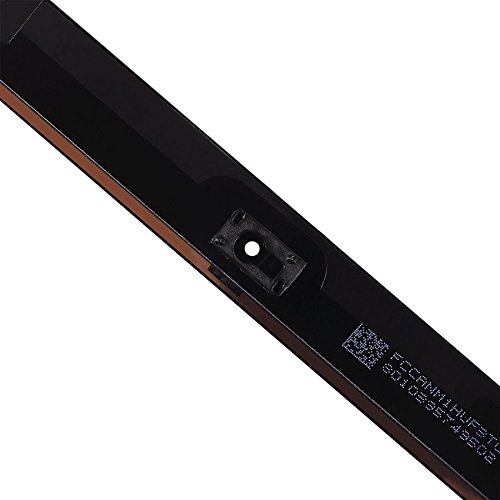
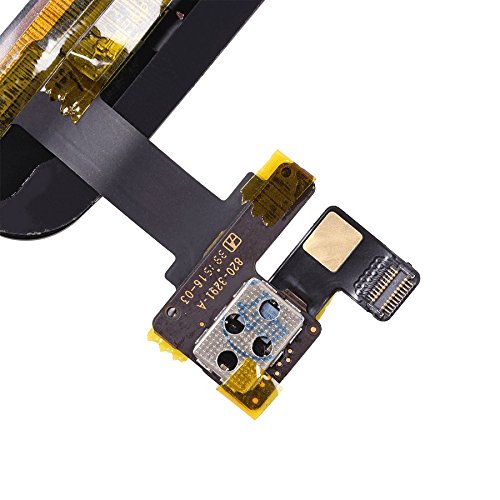
- Brand New - Grade S (like OEM) Digitizer Replacement
- Instructions are NOT included however multiple videos are available on YouTube
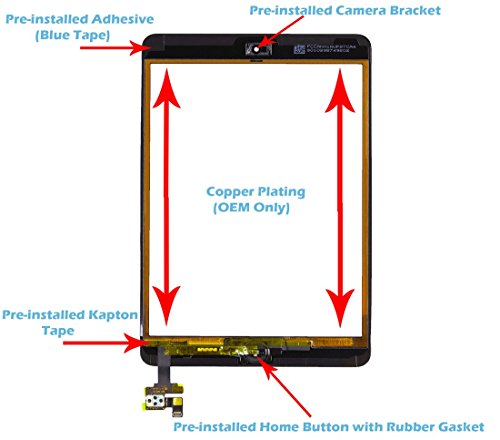
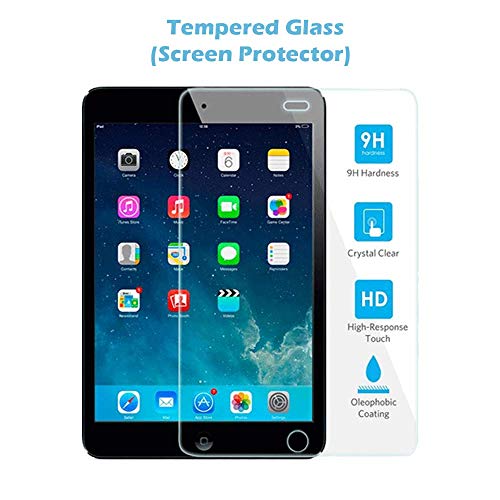
- Includes x1 Touch Screen Assembly Replacement, x1 Tempered Glass, x1 Repair Toolkit
- The iPad Mini Digitizer will not only fix your loss or sluggish touch function but will also fix your Home Button and restore your iPad to clean and new condition
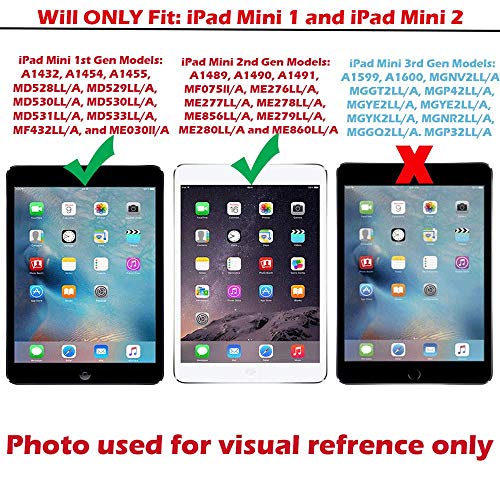
- Compatible with all iPad Mini 1st and iPad Mini 2nd (Retina) Generation Models: A1432, A1454, A1455, A1489, A1490, A1491, MD528LL/A, MD529LL/A, MD530LL/A, MD530LL/A, MD531LL/A, MD533LL/A, MF432LL/A, ME030ll/A, MF075ll/A, ME276LL/A, ME277LL/A, ME278LL/A, ME856LL/A, ME279LL/A, ME280LL/A and ME860LL/A (All Colors, Cellular and Wi-Fi Carriers)
-
Information
-
Twitter
-
Pinterest
-
Youtube
-
Facebook
Marjorie Marie Webb
THE REAL DEAL
The product came on time and was very well protected in an air filled chamber envelope and box. The kit came with all the essential tools and a protective tempered glass. I had ordered the wrong replacement and needed an ipad3 screen. Omni repairs helped figure out what I needed and even pointed me in the right direction to help save me money on the LCD which I also needed to replace. After install, I had no problem with the digitizer, the screen was responsive and a perfect fit. The seller/owner is very personable and available for help. I had e-mailed for some questions and got a quick response for my inquires. In the end, I installed an otterbox defender series case, solid and shock proof. I did have to remove the plastic screen protector that came with it. With the double layer of protection, tempered glass and the plastic, the screen was not very responsive. With the tempered glass alone everything was prefect.
Tyana Smith
Affordable and actually works
I installed the product and so far it seems pretty good I've tried different digitizes past and all they have done is failed did Ghost touches or other things but not this one and on my second repair I had broken the cable to my home button and the fact that this one came with one that was pretty great so all in all I would purchase again and probably will if I need another one
Nabila Sherin
FIRST RATE SERVICE!
I purchased a Unifix-White Ipad Mini 1 & 2 Touch Glass Digitizer Replacement Screen IC Connector Chip + Home Button Flex Assembly (Adhesive + Tool Kit Included) from US Cellular to repair a broken digitizer screen on an iPad Mini 2. I received the package promptly and in good shape. After the install everything seemed good, but after a few days things began to go wrong. It became difficult to swipe, the touches didn't seem to connect properly and functionality became a problem. Since I had initially received a nice follow-up letter from the company after my purchase, I decided to let them know my issue. My letter was immediately responded to and an offer to replace the faulty digitizer was extended to me. Adam, whom I corresponded with, went out of his way to make things right as quickly as possible. I received the replacement digitizer screen quickly and repaired the iPad with no issues. Even though the first product was defective, Adam and US Cellular were first rate in their service and commitment to make things right. I will happily and confidently recommend ordering their products and will do so myself.
Bunnary Hang
Everything you need to replace ipad Mini 2 Retina Display
Great Kit. Make Sure to watch a YouTube video to help you along the way. Took a long time to replace but I took my time as not to screw it up. In the end I replaced the broken screen flawlessly. Kit comes with everything you need including Screw Drivers for 2 different set of small screws to remove. The Suction Pads did not work very well. Too Flimsy. Just used a sharp blade to get under the screen. Bonus it came with a thick Screen Protector which was an added bonus since it was my Son's ipad and needed all the protection i could get.
Kirsten Figueroa
Fixed it!!
I was one try away from ordering my son a new Ipad! This was my second attempt at replacing the screen on his Ipad mini 2. The first screen i purchased from amazon was the Wefix Black iPad Mini Touch Screen Digitizer... I found many informative and how to videos on YouTube which warned of the infamous Ghost Touch. Well, after installing the first screen i had the ghost touch and nothing i tried would make it go away, it was truly ghostly. I narrowed it down, after countless hours i will never get back, to the cables from the screen to the Ipad were defective (not insulated properly). I purchased this Unifix-White Ipad mini 1 & 2 Touch Glass... and low and behold after waiting 10 days for the item to ship due to being on backorder (i now know why) it arrived and within 30min i had the Ipad screen installed and working again. I attribute this to two major manufacturing differences in the screens. The touch sensors that surround the back side of the screen on the Wefix was silver strip versus the gold strip on the Unifix (which you will see is how the original screen was). The other thing was the use of Kapton tape that was on the Unifix, where is was non existent on the Wefix. if you are attempting to replace your ipad mini 2 screen i would try this one first.
Gina Passarella
Great replacement part, if you install very carefully
It was very difficult to remove and replace the screen of my son's ipad mini because he shattered it so badly, but once installed (very, very carefully) it works as good as new. The kit provides almost everything you need, though I did buy some rubber gloves to wear while installing.
Mil Lhet
THE BEST SERVICE EVER.
Perhaps the most exceptional customer service I have ever experienced!! I bought this repair kit and totally botched the install. I put my thumb through the glass at the last step. I was annoyed and frustrated and gave Omnirepairs a one star review. Tom was relentless in his efforts to correct the situation, even in the face of my resistance. In the end, we have a fully functioning iPad Mini again and could not be more satisfied with the whole affair. I will NEVER seek technical assistance anywhere other than Omnirepairs ever again. Ever.
Sheelagh Kathryn Lovaas
Good bit of kit and relatively easy repair (once old screen removed)
Arrived yesterday and installed the new screen in about 30 minutes. Did not need the tools as I'd already taken the old broken screen off. Seems like a high quality part and I don;t have any problems with ghosting or screen not being responsive. There are a lot of videos out there to show how to change screen and recommend watching a few before trying to take broken screen off (they all seem to have slightly different info so good to watch a few to get complete picture). I think this is hardest part of the repair but was pretty easy for me as my son had dropped his ipad and screen was completed knackered. Had holes in the glass at top of screen which actually made pealing the old screen off easier and could get under the edge there. Used a hair dryer to heat screen and loosen glue and then just pealed off the broken sections in pieces. Few tips: 1. Tape screws to paper where you can hand draw an outline and location of where they come from. 2. Make sure you remove all the glue from the frame before installing the new screen. Do this before connecting new screen. I used acetone on ear buds to loosen / dissolve and then some sandpaper to get residue off. 3. Try not to touch the LCD screen as bugger to clean. Seems to attract dust. I used glasses cleaner and cloth to clean and worked well. 4. DO NOT REMOVE YELLOW TAPE on back of screen as isolates digitizer elements (says this clearly on sticker on the screen!). I had to trim one side with razor blade as was sticking over the glue strip. 5. Glue strip covering is a bugger to get off. I used a razor blade to get under the edge (in 4 pieces) and goes under the connector at bottom so you have to work from both ends 6. Cover LCD screen with something to prevent scratching 7. Take your time. Repair is pretty straight forward. Don't force the connectors in, they don't need much to seat in place 8. Save the foam you remove from the top of screw and re-use 9. Don't forget the magnets (two, one of top and bottom of screen) and the small bits of tape with them. Take these off the broken screen (I actually left them off as going wth Ottorbox type case now and don't need them) 10. Make sure dented corners are pushed out so screen bits OK 11. Test prior to removing glue covering and fixing screen in. You need to reassemble to do this and can lay screen on top of LCD 12. Disconnect battery prior to disconnecting screen or LCD (once you've removed the small connection cover) as can apparently blow a fuse somewhere if you don't Mine worked perfectly first time. Will check back in a few months to provide feedback on reliability.
Yağmur Ceren
Awesome product, stellar customer service
I needed this replacement part after my son dropped our mini 2, dented in the corner, and cracked the screen. I was considering leaving it as-is since the crack wasn't terrible (being in the corner) and I'd never done an ipad digitizer replacement before. But the ipad started "ghost touching" and I had to do something lest it become an expensive paper weight. I debated getting a professional to do it, but in the end it would be much more expensive with little guarantee they would use a quality part. So I researched around for a replacement digitizer both on Amazon and elsewhere, and arrived at this item from Omnirepairs. There were cheaper alternatives, but based on the reviews this had the best balance of cost and quality. The other reviews for this item were spot on. Not only was the product high quality, the tools were great. Others opined that the suction cup didn't work for them, but for me it worked just fine (and very necessary to pry the old glass off the frame). True there were no instructions, but I found that largely unnecessary. There are PLENTY of videos on youtube and I recommend others doing this for the first time to watch as many as possible. I learned a bit more from each one. The other reviews (especially the most up-voted one) also helped a ton with tips and pointers for newbies such as myself. Finally, the customer service (as others similarly indicated) was stellar. I had a small issue that I contacted support about. Tom (I believe he's the owner) got back to me right away and got me sorted. It's important that both the product be high quality, but when there are issues (as there inevitably are) that there is solid customer service standing behind the product. I'm very happy with the finished product. Some tips that helped me along the way: 1) Take your time, that's the most important pointer. It took me about 5 hours over the course of 3 days to finish it. 2) Cleaning the frame of the old adhesive before installing the new digitizer was key. Time consuming but important for the new adhesive to adhere. Some people use goo-gone or some solvent to remove, I found that unnecessary and some say detrimental. Scraping off with a metal tool (same tool I used in #3 below) and some rubbing alcohol did the trick for me. 3) If you have a dent (as I did) you MUST resolve that before installing the digitizer Again youtube is your friend, I bought a tool off ebay separately that I could hammer out the dent. 4) Hair dryer is fine, you don't need a heat gun to soften the adhesive. 5) I think there are supposed to be 7 screws on the guard plate (underneath the LCD), mine only had 5. Seems like its common to not have the full set of screws for whatever reason. 6) Don't forget to disconnect the battery BEFORE you disconnect the other connectors (LCD & digitizer).
Sam Ghauri
Great deal and service!
This is a great deal! The new digitizer was very well packed, and the kit included everything I needed to replace the screen. It is important to find a good YouTube video and take your time! I was able to replace it in about an hour and a half, the hardest part was getting the old shattered digitizer off. Attention to detail is key as the LCD screen is very fragile and will break or scratch easily. I will update after I've had it a while, but for now everything works and my iPad mini looks like new again. There was also a tempered glass screen protector included, which was a nice surprise, and it's a high quality product. I was careful to not remove the gold tape on the back of the new glass, and the only thing I didn't bother to do was transfer the magnets from the old digitizer that make the screen auto shut off when closing the case. So far I am very pleased with this product, and the great customer service.